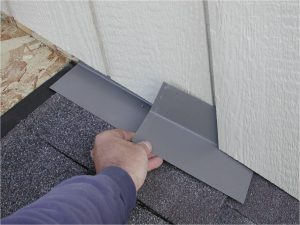
Posted march 4 2017 filed under roof installation roof repair maintenance.
How to install step flashing under existing siding.
Nail flashing to roof deck only.
Shingles need to be fastened with nails in the top area and then cover top with another step flashing piece with nails.
Fasten that shingle with two galvanized nails at the.
Wide and 2 in.
Cut a piece.
You have to work up your roof and cover every single end suitable with shingles.
Bent into an l shape.
Cut step flashing pieces to be 10 in.
Galvanized sheet metal bent at a 90 degree angle i e.
Once even a small section of roofing cement fails you ll have a leak.
Nail through flashing into shingle do not extend flashing above top of shingle and.
Here s how to do it right the first time.
Every single end should be covered with flashing.
This flashing is typically field fabricated from a sheet of 26 ga.
Use roofing nails to install the l shaped flashing flush with the roof and wall then cover it with roofing cement and reattach the roofer s felt.
Step flashing is used to provide a water tight connection where roofing adjoins a vertical juncture.
Slice along the bend line about 4 inches into the first piece of flashing at the bottom of the roof with tin snips.
Lay a shingle over the step flashing starting at the roof edge.
Cover tops of step.
Longer than the shingle s exposure.
Continuous flashing against a sidewall is one way to install a roof but it s not the correct way.
How to install step flashing under siding 1.
It may seem as if a single piece of flashing would offer more protection than many pieces of step flashing.
Begin by removing the shingles at the affected area and removing old flashing if present.